How to Take Good Photos: Essential Camera Tips
Learning how to take good photos is not simply about owning an expensive camera or a high-performance lens. Great photographs come from understanding how to use your camera, recognize good light, compose a scene and choose the right perspective for your subject.
Whether you are using a mirrorless camera for the first time or want to improve your existing photography skills, learning a few fundamental techniques can make a noticeable difference.
From choosing the right camera settings to changing your shooting position, small adjustments can completely change the look and feel of a photograph.
In this guide, we introduce practical camera photography tips that can help you create more intentional and visually engaging images.
What Makes a Good Photograph?
There is no single formula for a good photograph.
A successful image can be technically sharp and correctly exposed, but it can also be memorable because of its composition, timing, subject or use of light.
Before taking a photograph, consider these basic questions:
- What is the main subject?
- What do I want the viewer to notice?
- Is the subject clearly separated from the background?
- Is the lighting suitable?
- Would another camera angle work better?
- Should I use a different focal length?
- Are there distracting elements in the frame?
Thinking about these questions before pressing the shutter can help you make more deliberate photographic decisions.
1. Identify Your Main Subject
One of the simplest ways to improve a photograph is to clearly identify the subject.
Your subject could be:
- A person
- An animal
- A building
- A landscape
- Food
- A product
- A flower
- A moving vehicle
Once you know what you want to photograph, look at everything surrounding it.
A cluttered background can compete with your subject, while a simpler background can make the subject easier to recognize.
Try changing your position or focal length to reduce distracting elements.
Sometimes moving just a few steps can make a significant difference.
2. Learn the Basics of Composition
Composition is the arrangement of visual elements within a photograph.
Good composition helps guide the viewer’s attention and can make an image easier to understand.
There are many composition techniques, but you can begin with a few simple ones.
Rule of Thirds
Imagine dividing your frame into nine sections using two horizontal and two vertical lines.
Placing your subject along these lines or near their intersections can create a balanced composition.
Most modern cameras allow you to display a grid on the screen or viewfinder, making it easier to practice.
However, the rule of thirds is only a guideline.
A centered composition can sometimes be more effective, particularly when photographing symmetrical subjects.
Leading Lines
Leading lines are elements within a scene that guide the viewer’s eye.
They can include:
- Roads
- Paths
- Bridges
- Railings
- Buildings
- Fences
- Rivers
Look for these elements when composing your photograph and consider how they can direct attention toward your main subject.
Negative Space
Negative space is an area of relatively empty space surrounding your subject.
It can make a subject stand out and create a sense of simplicity.
Negative space can work particularly well for:
- Portraits
- Wildlife
- Minimalist photography
- Product photography
Framing
You can also use objects within the scene to create a natural frame around your subject.
Doorways, windows, trees and architectural structures can all be used as framing elements.
These techniques are useful camera photography tips because they can be applied regardless of which camera or lens you use.
3. Change Your Camera Position
One of the easiest ways to create a different photograph is to change where you are standing.
Many photographers instinctively take pictures from eye level.
Instead, try photographing your subject from:
- A low angle
- A high angle
- Eye level
- The side
- Behind the subject
- A closer position
- A farther position
Changing the camera position can alter the relationship between the subject and its surroundings.
Low-Angle Photography
A low camera position can make a subject appear larger or more imposing.
This can work particularly well when photographing:
- Buildings
- Trees
- Vehicles
- People
High-Angle Photography
Shooting from above can emphasize shapes, patterns and relationships between objects.
It can also provide a different perspective for everyday subjects.
Eye-Level Photography
Eye-level photography provides a familiar and natural perspective.
It is particularly useful for:
- Portraits
- Street photography
- Documentary photography
- Everyday scenes
When trying to understand how to improve your photos, changing your camera position is one of the easiest techniques to practice.
4. Move Closer or Farther Away
Distance can have a major effect on the appearance of your photograph.
Moving closer can emphasize:
- Details
- Textures
- Facial expressions
- Small objects
- Patterns
Moving farther away can reveal:
- The surrounding environment
- Scale
- Context
- The relationship between your subject and its surroundings
Try photographing the same subject from several distances.
Instead of immediately relying on the zoom, physically changing your position can create a different perspective.
However, always consider your surroundings and safety before moving closer to a subject.
5. Understand Focal Length
Focal length affects the angle of view of a lens.
A shorter focal length provides a wider view, while a longer focal length provides a narrower view.
As a general guide on a full-frame camera:
Wide-Angle Focal Lengths
Approximately 16-24mm can be useful for:
- Landscapes
- Architecture
- Interiors
- Travel
- Astrophotography
Standard Focal Lengths
Approximately 35-50mm can be useful for:
- Street photography
- Travel
- Everyday photography
- Environmental portraits
Telephoto Focal Lengths
Approximately 70mm and beyond can be useful for:
- Portraits
- Sports
- Wildlife
- Events
- Distant subjects
These are general guidelines rather than strict rules.
The right focal length depends on your subject, shooting distance and desired composition.
6. Use a Zoom Lens to Explore Different Perspectives
A zoom lens can be especially useful when learning photography because it allows you to experiment with different focal lengths without changing lenses.
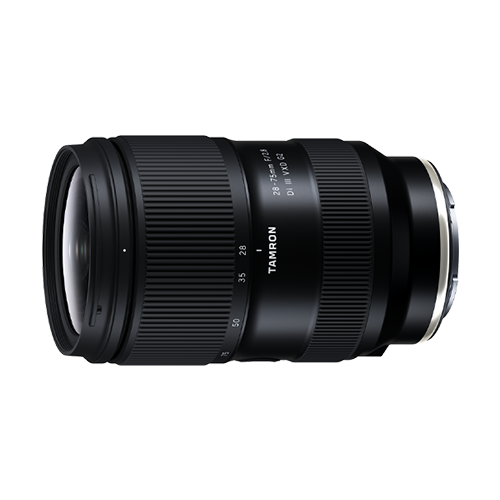
For example, the 28-75mm F/2.8 Di III VXD G2 (Model A063) covers a useful range from wide-angle through standard and short-telephoto perspectives.
At 28mm, you can include more of the surrounding environment.
At 50mm, you can create a more conventional perspective.
At 75mm, you can isolate your subject more easily and reduce the amount of background included in the frame.
Experimenting with the same subject at different focal lengths is an effective way to understand how lenses influence composition.
7. Pay Attention to Light
Photography is the process of recording light, so understanding light is essential.
Before taking a photograph, look at:
- Where the light is coming from
- How strong the light is
- Whether the light is soft or harsh
- Where the shadows fall
- Whether the subject is evenly illuminated
Different lighting directions can create very different results.
Front Lighting
Light coming from behind the photographer illuminates the subject from the front.
This can produce relatively even lighting and can work well for:
- Portraits
- Food
- Products
- Everyday photography
Side Lighting
Light coming from the side creates stronger shadows and can reveal texture.
It can be effective for:
- Portraits
- Architecture
- Food
- Still life
Backlighting
When the main light source is behind the subject, the subject may appear darker.
Rather than automatically avoiding backlighting, try using it creatively.
You can create:
- Silhouettes
- Rim lighting
- Atmospheric portraits
- Bright, high-key images
Learning to observe light is one of the most valuable camera tips for better photos because it does not require any additional equipment.
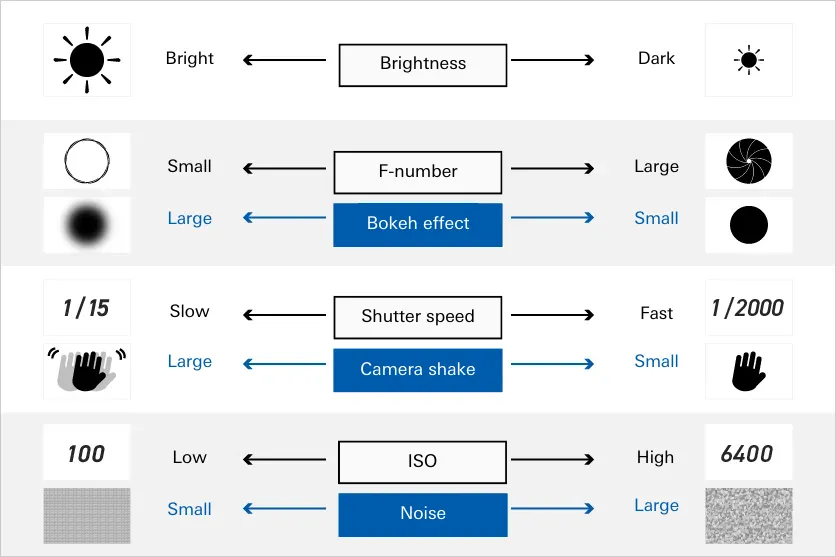
8. Understand Aperture
Aperture controls the opening inside the lens.
It is represented by an F-number such as:
- F1.4
- F2
- F2.8
- F4
- F5.6
- F8
A smaller F-number represents a wider aperture.
A wide aperture allows more light into the camera and can produce a shallower depth of field.
For example, using F2.8 for a portrait can help separate the subject from the background.
A narrower aperture such as F8 can keep more of a scene within the depth of field.
The best aperture depends on your subject.
For portraits, you may want a blurred background.
For landscapes, you may want more of the scene to remain sharp.
9. Understand Shutter Speed
Shutter speed determines how long the camera’s shutter remains open.
It affects both exposure and motion.
A fast shutter speed can help freeze movement.
For example:
1/1000 second can be useful for fast-moving subjects.
A slower shutter speed can introduce motion blur.
For example:
1 second can be used to intentionally capture movement or create long-exposure effects.
When choosing shutter speed, consider both your subject’s movement and your ability to hold the camera steady.
10. Adjust ISO When Necessary
ISO is another important part of exposure.
ISO is another important part of exposure.
Increasing ISO can help you photograph in darker conditions without using an extremely slow shutter speed.
However, higher ISO settings can also increase visible image noise.
When there is enough light, using a lower ISO can help produce cleaner images.
In low-light situations, however, increasing ISO can be preferable to using a shutter speed that is too slow for handheld photography.
The goal is to balance ISO, shutter speed and aperture according to the situation.
11. Keep Your Subject in Focus
Sharp focus is particularly important when photographing people, animals and other subjects where specific details need to be clear.
Before taking the photograph, determine what should be in focus.
For static subjects, single autofocus can be useful.
For moving subjects, continuous autofocus can help track movement.
Modern cameras may also provide subject-detection features for:
- People
- Animals
- Birds
- Vehicles
However, autofocus does not replace careful composition.
Always check where your camera is focusing and whether the important part of your subject is sharp.
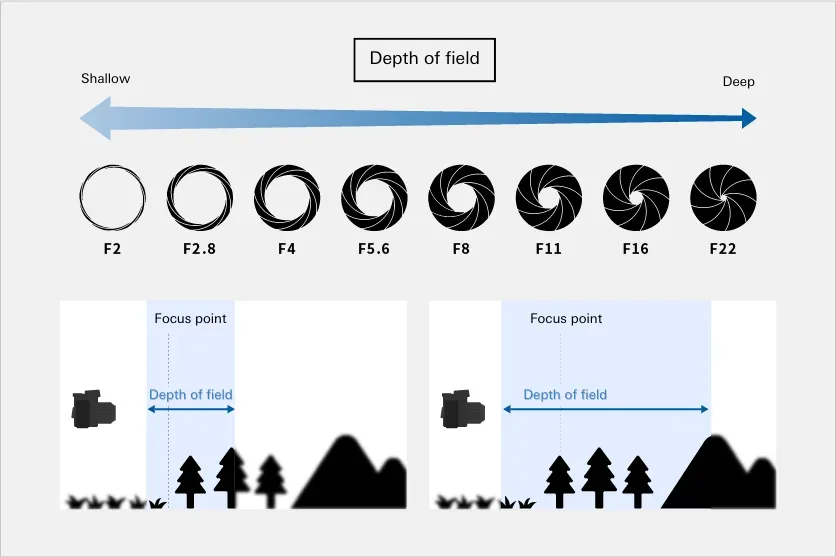
12. Use Depth of Field Creatively
Depth of field describes how much of a scene appears acceptably sharp.
A wide aperture can produce a shallow depth of field.
This can be useful when you want to separate a subject from its background.
A narrower aperture can keep more of the scene sharp.
For example:
F2.8 → stronger background separation
F8 → greater depth of field
Neither approach is inherently better.
Choose the depth of field based on what you want the photograph to communicate.
13. Watch the Background
A distracting background can weaken an otherwise strong photograph.
Before taking the picture, scan the entire frame.
Look for:
- Bright objects
- Clutter
- Poles or branches
- Signs
- Unwanted people
- Strong lines
- Distracting highlights
You may be able to solve the problem by:
- Moving sideways
- Changing your camera height
- Moving closer
- Moving farther away
- Changing focal length
- Using a wider aperture
Sometimes the best camera photography tips are simply about slowing down and looking carefully before pressing the shutter.
14. Use Natural Lines and Shapes
Look for lines, curves and patterns within your environment.
Architectural elements, roads, paths, fences and shadows can all contribute to composition.
You can use these elements to:
- Guide the viewer
- Create symmetry
- Add depth
- Frame your subject
- Establish a visual direction
Photography becomes more interesting when you begin seeing these patterns before taking the photograph.
15. Try Different Perspectives
When photographing a subject, don’t stop after taking the first picture.
Try creating several versions.
For example:
Version 1: Eye level
Version 2: Low angle
Version 3: High angle
Version 4: Close-up
Version 5: Wider environmental view
Later, compare the photographs.
Ask yourself which version communicates your subject most effectively.
This simple exercise can help you understand how to improve your photos without buying additional equipment.
16. Choose the Right Lens for Your Subject
Different subjects benefit from different focal-length ranges.
A wide-angle lens can be useful for:
- Landscapes
- Architecture
- Interiors
- Travel
- Vlogging
A standard zoom can be useful for:
- Everyday photography
- Travel
- Street photography
- Portraits
- Events
A telephoto lens can be useful for:
- Wildlife
- Sports
- Birds
- Distant subjects
- Portraits
There is no single lens that is ideal for every situation.
Instead, consider what you photograph most often and choose your lens accordingly.
17. Practice With the Camera You Already Have
One of the most effective ways to improve your photography is to practice regularly.
You do not need to buy a new camera every time you want to improve.
Instead, challenge yourself to photograph the same subject in different ways.
Try:
- Different focal lengths
- Different camera positions
- Different apertures
- Different shutter speeds
- Different lighting directions
- Different compositions
For example, photograph the same object at 28mm, 50mm and 75mm.
Then compare the results.
Notice how the field of view, background and relationship between the subject and surroundings change.
This kind of exercise teaches you how your equipment behaves in real situations.
18. Review Your Photographs
Taking photographs is only part of learning.
Reviewing your images afterward can help you identify what worked and what did not.
When reviewing a photograph, ask:
- Is the subject clear?
- Is the composition balanced?
- Is the exposure appropriate?
- Is the subject sharp?
- Is the background distracting?
- Is the focal length appropriate?
- Could I have changed my position?
- Would different lighting improve the image?
Instead of simply deciding whether you like a photograph, try to understand why it works or does not work.
This makes every shooting session an opportunity to learn.
19. Take Multiple Versions of the Same Photograph
Digital photography makes experimentation easy.
If you are unsure about a composition, take several versions.
Try:
- A wide shot
- A medium shot
- A close-up
- A horizontal composition
- A vertical composition
- A different camera angle
You can compare them later and determine which approach communicates your subject most effectively.
Over time, this process will help you develop your own preferences.
20. Develop Your Own Photography Style
Photography rules are useful for learning, but they are not absolute.
Once you understand the basics, experiment with breaking them.
Try centered compositions.
Use unusual angles.
Photograph against the light.
Use motion blur.
Fill the frame.
Leave large areas of negative space.
The important thing is to understand why you are making a particular choice.
Your photography style develops through repeated experimentation and observation.
Final Thoughts
Learning how to take good photos starts with understanding the fundamentals rather than relying entirely on camera equipment.
Pay attention to your subject.
Think about composition.
Change your camera position.
Experiment with focal length.
Observe the direction and quality of light.
Learn how aperture, shutter speed and ISO affect your photographs.
Keep your subject in focus and pay attention to distracting backgrounds.
Most importantly, practice.
The same subject can produce completely different photographs simply by changing your position, focal length, aperture or composition.
These camera photography tips can help you become more deliberate with your camera and give you a better understanding of the decisions behind each photograph.
If you want to improve your photos, start with the equipment you already have and experiment with one technique at a time.
Photography is a continuous learning process. The more you observe, experiment and review your results, the more naturally these techniques will become part of your photography.
TAMRON products mentioned in this article